In‑Floor Safes: Build It In Early (or Retrofit It Properly) — Gold Coast Guide
Posted by Jim Noort on 14th Feb 2026
Why people love in‑floor safes
They’re not for every situation — but for the right home, they’re brilliant.
![]() Concealment
Concealment
They sit below floor level and can be covered by a rug, mat or furniture — meaning they’re often missed completely in fast burglaries.
![]() Hard to remove
Hard to remove
When installed correctly, an in‑floor safe is surrounded by structure — it’s not something someone “walks out with”.
![]() Practical access
Practical access
Wide opening, easy drop-in access, and great for passports, documents, jewellery and small valuables.
![]() Design-stage wins
Design-stage wins
Planned at build time, it’s clean, neat, and avoids expensive post‑cut concrete work later.
Building new? Here’s what to tell your architect
This is the “easy mode” for in‑floor safes — because the slab can be prepared from the start.
![]() Architect / Builder Brief — In‑Floor Safe Provision
Architect / Builder Brief — In‑Floor Safe Provision
- Location: nominate a low‑traffic, private area (walk‑in robe, linen cupboard, master closet). Avoid wet areas (bathrooms/laundry) and known flood paths.
- Slab coordination: confirm slab type early (standard vs post‑tension) and ensure the safe zone won’t clash with tendons, plumbing or electrical services.
- Box‑out / set‑down: request a formed recess (“box‑out”) at slab pour so the safe can be installed cleanly and finished flush.
- Finished floor level: confirm final floor build‑up (tiles, timber, carpet) so the safe lid/cover sits neat and doesn’t become a trip edge.
- Moisture planning: allow for sensible moisture mitigation and storage practices (desiccant, sealed pouches for documents).
Want us to help specify the safe size before you pour? Call (07) 5601 1838 and we’ll make it simple.
Slab pour options: “Box‑out” vs “Shroud”
Two common approaches — both work, but they suit different build schedules.
| Approach | When the safe goes in | Best for | Why people choose it |
|---|---|---|---|
| Box‑out / set‑down | Safe can be installed during the build or near completion (depending on access & schedule) | Most residential builds | Simple planning: the concreter forms the pocket at pour, and you avoid post‑cut work later. |
| Shroud (install later) | Shroud is set during slab pour; safe is installed later when the building is more secure/finished | Where you want fewer people seeing the safe and less site exposure | Keeps the “safe” off-site until the right time, reducing weather exposure and unwanted attention. |
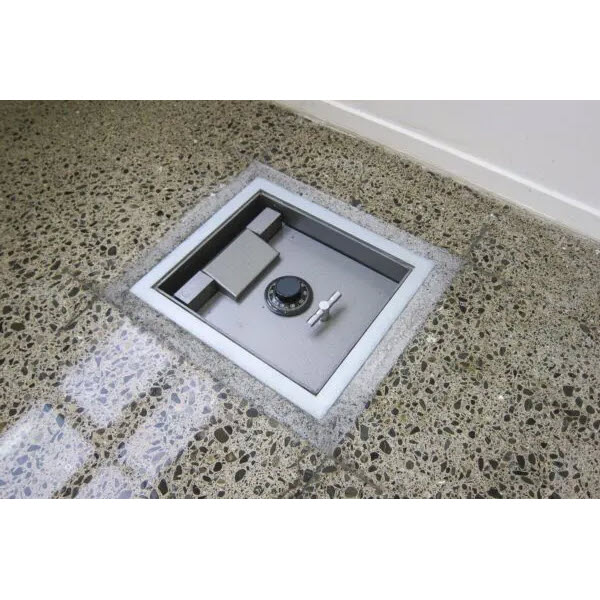
Existing slab retrofit: what a proper install looks like
Yes — you can add an in‑floor safe later. No — it’s not something you want “someone having a go” at.
![]() Typical retrofit workflow)
Typical retrofit workflow)
- Mark it out in the correct location (consider door swing, access, concealment).
- Confirm slab conditions (services and slab type). If post‑tension is suspected, treat it seriously.
- Cut the slab cleanly and remove the section.
- Dig/excavate to required depth and prepare the base.
- Place and level the safe.
- Pour concrete bog/slurry to lock it in, then finish with a clean concrete pour.
- Float off / finish to suit the final floor covering.
![]() Need a concreter for an in‑slab install?
Need a concreter for an in‑slab install?
At Terry’s, we can recommend a concreter we work with for retrofit installs — and we’ll help you plan the safe location so it ends up neat, flush, and practical to use.
Moisture: the silent killer of “hidden safe” setups
If you remember one thing from this article, remember this.
![]() Simple protection habits (cheap, effective)
Simple protection habits (cheap, effective)
- Use desiccant packs (silica gel) and replace them periodically.
- Store passports, birth certificates and cash in a sealed document pouch inside the safe.
- Avoid placing the safe in a location that routinely gets water across the floor (laundry, bathroom, garage thresholds).
- If you want certified fire performance for documents/media, consider a dedicated fire-rated safe instead of relying on concrete alone.
Browse Terry’s in‑floor safe range
Start broad, then narrow down by size, lock preference and install scenario.
| Model / Range | Best for | Why it’s popular | Link |
|---|---|---|---|
| Dominator DF Series | Home + small business concealed storage | Multiple sizes and lock options, flush concealment plate, and larger sizes with lift assist. | DF‑1 • DF‑2 • DF‑3 • DF‑4 |
| Secuguard AP‑430 | Premium concealed storage with strong door build | Plate door build with relocker protection and a cover lid for a neat finish. | See on Secuguard page • |
Not sure which one fits your slab depth and finished floor height? Call (07) 5601 1838 — we’ll help you choose the right safe and the right install approach.
In‑floor safe FAQ (quick answers)
The questions we hear all the time in the showroom.
Is an in‑floor safe good for cash and jewellery?
Yes — especially if concealment is a priority. Just make sure the safe and the install match the risk level, and don’t ignore moisture control.
Can I install one in any concrete slab?
Not always. Slab thickness, existing services, and slab type (including post‑tension) can change what’s possible. We’ll advise before any cutting happens.
Should I install it during the build or after handover?
Best practice is to plan it at design stage, prepare the slab during the pour, then install at the most sensible time for security and weather exposure.
Ready to plan your in‑floor safe?
We’ll help you choose the safe, confirm the location, and make the install practical and tidy.
Delivery/install access note: pricing and scheduling assumes reasonable access (no stairs, no steep driveways, and no tight/awkward paths). If access is difficult, we’ll confirm a safe plan and quote based on your site.